
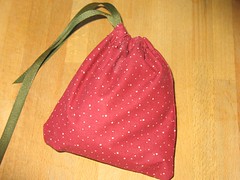
 My kids have a lot of classmates. 41. Plus three teachers. I’d like to give them all a little something, but I don’t want to buy more plastic cr*p, litter the world with wrapping paper, or spend a fortune. Or shop. So I decided to make packets containing the dry ingredients for shortbread that they can make with their parents (only a stick of butter required), and wrap them in drawstring bags made from cheap’n’cheerful quilting cotton, that the kids can use as treasure-keepers.
With my (very) rudimentary sewing skills, making 30 bags took me about 2 hours all in. Filling up sandwich bags with dry ingredients probably took another hour and a half, although I did it in several sessions (and found it quite relaxing: a cup of this, quarter of a cup of that, two spoons of the other).
My costs were about 50 cents per package and could have been cheaper if I’d had a fabric stash and used yarn for the drawstrings. Even more importantly, I spent no time in toy stores, dollar stores or any place I didn’t want to be.
MATERIALS
- Ziplock sandwich bags (you can get biodegradable ones or hope they get reused). Roughly 6″x5″
- Cotton or muslin or flannel or some other cheap fabric (I bought Christmas-themed cotton which was already on sale the day before Thanksgiving). I was making 44 bags roughly 6″ x 7″ (before seaming) so I bought 3 yards of a 45″ wide fabric.
- Thread to match.
- Sewing machine and rudimentary knowledge of how to use it (believe me, that’s all you need. This could be done by hand. It would just take a whole lot longer).
- Ribbon (about a foot for every bag you’re going to make). I used grosgrain, but ran short and ended up using yarn for a few bags.
- Dry ingredients for your favourite cookie recipe.
- Paper for the instructions.
METHOD
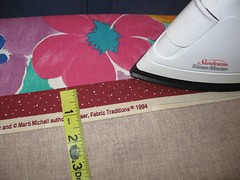 -Iron the fabric and cut, lengthwise into three equal strips (15″ tall each)...
-Iron a hem into the long edge of each strip as follows.
.
Place the fabric pattern-side down on your ironing table..
Fold over a 1.5″ hem and iron it.
.
.
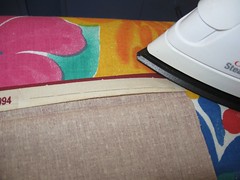
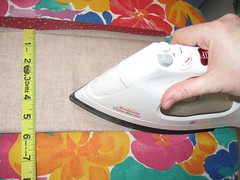
-Open up what you just ironed, and fold the raw edge down to the crease..
Iron the new edge.
.
. – Fold over the original crease again for a nice raw-edge-free hem.
Repeat on all long edges.
..
-Fold in half, right sides together, and iron along the bottom to hold it in place
.
(No pins! No basting!)
(Somewhere my Primary school sewing teacher is sobbing gently!)
.
.
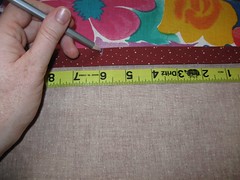
– Mark the fabric every six inches.
This is where you will sew the bags’ side seams.
...
.
.
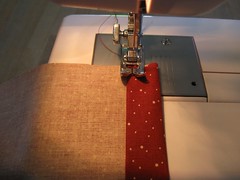
– Sew along the long edges. Be careful to sew close to the folded edge, so that you create a large enough ‘pocket’ for the drawstring to go through.
Do both long edges on all your strips of fabric.
..
.
.
.
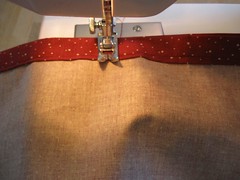
– Sew the side seams.
.Place the needle a little to one side of the 6″ mark you made,and a little below the long seam you just sewed — a few millimetres will do. (I know, I’m mixing measuring systems, but those tiny parts of an inch annoy me. Millimetres are good. Look ’em up.)
Reverse up and sew just a little over the long seam, then sew down to the bottom of the bag. You can stop a little before the bottom crease, and reverse a bit for a secure end, or you can just run off the bottom of the bag. (These are quick and dirty gifts for kids who will lose them in three weeks anyway!).
.
.
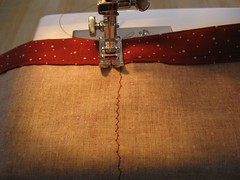
– For the side seam of the next bag, place the needle a few millimetres to the left of the seam you just made.
(this picture shows that I was using a zig-zag stitch at first, but I abandoned that for straight seams.I think they worked better).
Repeat the same method, backing up a bit over the long seam and sewing to the bottom.
– Repeat this all the way along the strip until you have a series of little almost-6″ pockets in the fabric.
.
.
.
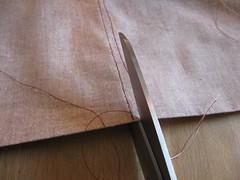
– Cut carefully between the close side seams.
(The little bit of reversing-over-the-long-seam you did will hold the drawstring pocket’s seam in place when you cut through it).
– Trim as many of the long threads as you can bear, but don’t be too fussy
(see point above about these being for kids).
.
.
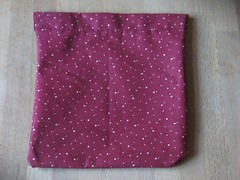
– Turn right-side out.
Thread 12″ or grosgrain ribbon onto a large-eyed tapestry needle and push through the drawstring pocket, ending up where you started.
.
.
.
THE FILLING
 – I recommend setting up a production line, with all your dry ingredients in separate, large bowls on the counter top.
(Reaching into the flour bag over and over is just too foutery).
.
.
.
.
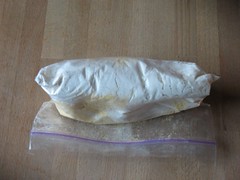
– Scoop your ingredients into ziplock bags, carefully squeeze excess air out and fold the bags over.
– Stuff the bags into the drawstring bags and pull closed.
.
.
.
OTHER NOTES
Don’t forget to add baking instructions, including: any other ingredients they’ll need, size of baking tin (if necessary), temperature and time, best method/shape, and any special requirements (for example, my shortbread needs to be pricked with a fork all over before being baked).
You can type and print the instructions and stick them in the bag, or you can get creative. You could hand-write one, scan it and print copies. Cut it out with fancy scissors, paste it to a square of your fabric that you’ve cut with pinking shears, and then tie it onto the drawstring. Go wild!
1 comment
Comments are closed.